If you’ve customized your Ribbon to suit your preference, working on a new computer without your favorite settings can be an inconvenience. Luckily, Microsoft Word allows users to import and export Ribbon settings. This guide will show you how to import and export the customized Ribbon settings from Microsoft Word.
Reveal the Ribbon in Microsoft Word
Typically, when you launch Microsoft Word, your Ribbon should be the next thing after the document’s name. If the Ribbon isn’t visible, it means it has been hidden. Here’s what you should do to reveal your Ribbon: Step 1: On your PC, click on the Start menu and search for Word.
Step 2: Click on the Word app from the results.
Step 3: Click on the upward arrow icon in the top-right corner of the app.
Step 4: Select ‘Show Tabs and Commands’ option.
Your Ribbon should be visible with all the sections and tabs available normally.
Export Custom Ribbon Settings From Microsoft Word
After revealing the Ribbon, you can make changes to the sections and tabs at your heart’s content. After that, you can export your custom Step 1: On your PC, click on the Start menu and search for Word.
Step 2: Click on the Word app from the results.
Step 3: On the Word document, navigate to the Ribbon. Select the File tab in the top-left corner.
Step 4: From the bottom-left column, select the ‘More…’ section.
Step 6: Click on Options.
Step 7: On the Word Options dialog box, scroll through the menu list on the left and select Customize Ribbon from the left column.
Step 8: On the bottom-right corner of that window, click on the Import/Export drop-down menu.
Step 9: Select ‘Export all customizations.’
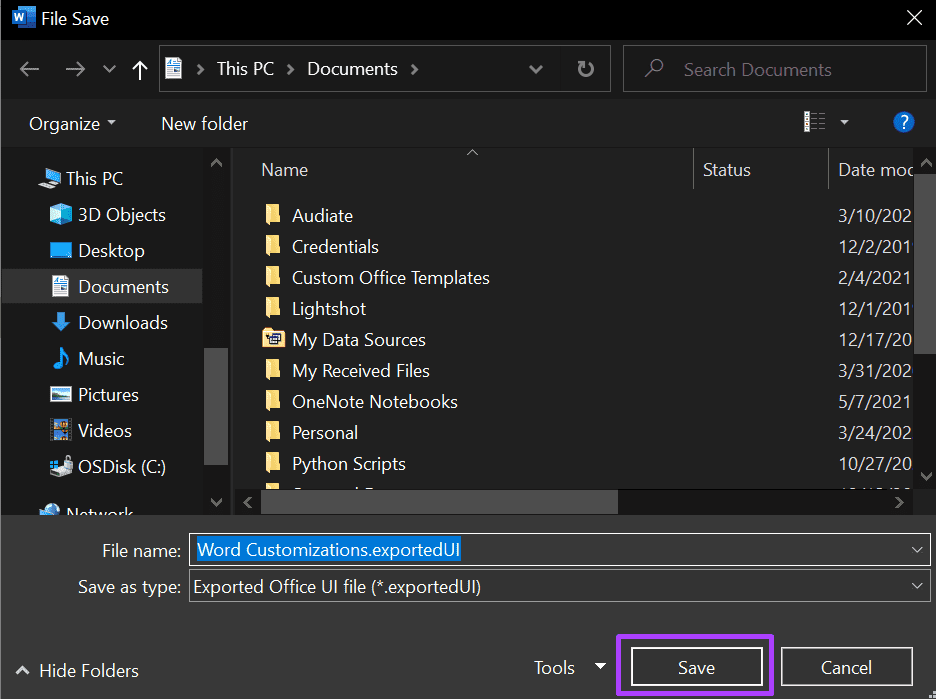
Step 10: Provide a descriptive name for the file you are about to export in the field labeled File name.
Step 11: Choose a location where you want to save the exported file. Step 12: Ensure the file type is saved as ‘Exported Office UI File (.exportedUI).’
Step 13: Click on Save.
You can always access the exported file once you complete the steps above. You can use it to restore your ribbon settings on another computer should you lose the current settings.
Import Custom Ribbon Settings in Microsoft Word
If you want to import custom Ribbon settings for Word, then it’s quite similar to that of exporting them. Here are the steps you need to follow: Step 1: On your PC, click on the Start menu and search for Word.
Step 2: Click on the Word app from the results.
Step 3: On the Word document, navigate to the Ribbon. Step 4: Click on the File tab in the top-left corner of the screen.
Step 5: Go to the bottom-left corner of the app and click on More Options.
Step 6: Click on Options.
Step 7: When the Options dialog box opens, scroll through the menu list on the left and select Customize Ribbon.
Step 8: In the bottom-right corner, click on the Import/Export drop-down menu.
Step 9: Select ‘Import customization file.’
Step 10: Navigate to the location of the .exportedUI file and select it.
Step 11: Click on Open.
Step 12: Click Yes on the pop-up window to replace all Ribbon customizations.
Step 13: Click on OK. So the Word will replaces the Ribbon and the Quick Access Toolbar settings. That means you can follow the old and uniform way of creating documents with your favorite settings at the top.
Customize Microsoft Office Ribbon
There you have it for importing and exporting Microsoft Word ribbon settings. Note that you can also follow the same steps above to customize the Ribbon settings. You also need to follow the same steps above for different versions of Microsoft Office apps to have your ribbon settings available across the board. The above article may contain affiliate links which help support Guiding Tech. However, it does not affect our editorial integrity. The content remains unbiased and authentic.


